Thursday, May 24, 2012

Papaya Pops


After making my Papaya Face Mask I had a good amount of papaya left over. Since papaya is yummy  frozen I decided on POPSICLES!!
I am obsessed with Popsicles!! I have collected quite a few molds from goodwill shopping. So this is my kick off to a Summer of Popsicles. I will have many more flavors, as the summer goes on!
Since I didn't know squat about papaya until I bought one, here is a great website that explains How to pick out a papaya.  
I like to make lots of different kinds of pops, so to keep them straight I label the end of each stick, that way I can store multiple kinds in the same bag.

 Papaya Pops!
3 1/2 cups  papaya cut up in 1 inch chunks
3/4 cup sugar
 1/4 cup lime juice
zest of 1 lime
Add everything into a blender or food processor, and blend until smooth. See that was easy!
Now divide into Popsicle molds, freeze for about and hour and add the sticks. Don't add the sticks right away because they will sink to the bottom. I always freeze my pops overnight before removing from the molds. To release from molds, just dip in warm water and pull out. Wrap the pops in wax paper or plastic wrap,then stack in a freezer bag. It's so much better then store bought pops!


Tuesday, May 22, 2012

Energy Bars


I came across this recipe when flipping through cookbooks at the library. Wow so great! This energy bar is full of protein and nutrients. The best part is you can add any kind of nuts and dried fruit. I kept it pretty traditional with raisins and almonds this time. Next time I plan to use figs and pecans.

Raisins, Oat, Almonds, Honey, Butter
Energy Bars:
Adapted from Green Market Baking Book
1/4 cup Salted Butter
1 cup raisins
1/4 cup Milk
1 TBS vanilla extract
2 1/4 cups oat flakes
1 cup chopped almonds
2 tsp cinnamon
2 eggs
1/3 cup honey

Preheat the oven to 350*
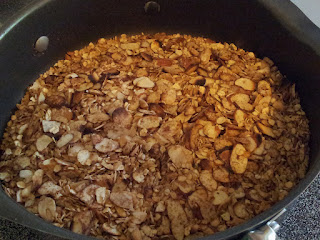
Toasted Oats and Almonds
Spray the sides and bottom of a square baking dish.  Rehydrate the raisins in the milk and vanilla let sit till plump about 15 min.  Melt the butter in a large pan on medium heat, add the oats and almonds toss to toast for about 5 min-  make sure to keep stirring. Add the cinnamon and cook for 1 min longer. Pull off the heat.  Add the eggs and honey to raisin mixture, mix well, then add to the oat raisin mixture. Stir till evenly combined. Spread the mixture into the baking dish, and bake till golden brown and pulling away from the sides about 20 - 30 minutes. Cool before cutting. They will keep for 1 week. I know they won't last that long here!

Monday, May 21, 2012

Papaya Face mask


I bought a papaya the other day. I really wasn't sure what I was going to do with it. Many things whirled through my head. I ended up doing some research and decided on a face mask. Papaya is full of Vitamin C and Vitamin E, plus an enzyme that helps ex-foliate for a smooth complexion. Just what I was looking for. Now what to add to it?  I saw many different recipes, but settled on the one I had everything for in my pantry. Papaya Almond and Honey.

This made a pretty big batch for how much I have on my face. Keep it refrigerated and use it within a week. It's a great soothing mask for sunburned or irritated skin. It can be applied on a regular basis.


Papaya Almond Face Mask:
1 cup Papaya cubed up
1/4 cup honey
1/4 cup plain Almonds

In my research I found a great site that explains How to pick a papaya.
 I peeled the papaya and then cut it in half. After cutting in half you will see the seeds, they are big black seeds. I tried one to see how it tasted and well lets just say don't do that! Way bitter! Scoop out the black seeds.  Cut the papaya in chunks, toss everything into the food processor, blend to a smooth constancy. Let sit for 10 min, then apply to your face avoiding the eye area. Rinse off after 10-15 min. This will help with a smooth complexion. 
NOTE: I am not a trained dermatologist, if you are allergic to any ingredient I suggest not using this recipe.  Use at your own risk.  However I used it and had great results! 


Tuesday, May 15, 2012

D.I.Y. Garden Lables

This D.I.Y. is for all you wine drinking gardeners! I have been getting more corks since my post wine cork board
Corks and Forks!
 I got some forks from goodwill, and stuck corks on them. While making this I remembered a funny scene from Dirty Rotten Scoundrels when Steve Martin is eating his dinner with a fork with a cork on it. Ha so funny! If you haven't seen it, look it up and watch. It's a classic!
 As you can see by the photos it's way cute.  I used forks of all sizes, and tried to find corks with some space to write clearly. Just write in pen and trace over it with a sharpie. Stick them in the ground and done! Happy drinking and gardening!


Monday, May 14, 2012

Chicken Pot Pie


I am still using up that giant chunk of pie dough that I brought home from work. I overdosed on Pop Tarts, chicken pot pie sounded good and easy. I do have to admit that I have never made chicken pot pie at home, however plenty of times at work. I had a limited supply of vegetables, and two picky boys. My filling wasn't as exciting as most but still Delicious. As long as the basics are covered- it doesn't matter.  On to Chicken pot pie! For the recipe below I have added a few vegetables to make it more exciting. In my actual pot pie there was chicken, potatoes, onion, carrots and corn.

Chicken Pot Pie
butter_pie_crust
2-3 Chicken breasts
2 Potatoes
2 Carrots
1 Onion
1 Zucchini
2 Celery stalks
1/4 cup Olive OIL
1/3 cup  corn kernels
1/3 cup  peas
1 cup broccoli blanched- chopped
1 egg
For the Sauce:
4 TBS butter
1/2 cup flour
1 1/2 cups milk
2 TBS sherry
2 tsp Dill weed
1 tsp black or white pepper


Make pie crust, and roll into 2 rounds, place 1 in a pie dish the other is for the top- set aside.
Preheat oven 375*
In oven proof baking dish cook chicken till no longer pink inside.  While chicken is cooking prep the vegetables: dice potatoes, carrots, onion, zucchini, celery- make sure to dice everything the same size. Toss them together in a bowl with the olive oil and garlic. Put them on a baking sheet and roast for about 15 min.  Toss the cooked chicken and vegetables with broccoli, corn and peas.
To make the sauce: in a saucepan on medium heat melt the butter. Once melted add flour and whisk for 1-2 minutes, slowly add the milk while whisking. Whisk over medium heat till thickened. Once sauce is thick add the sherry, dill, and pepper.

To assemble: pour sauce over the chicken and vegetable mix.  Add to pie shell. Take the top pie crust and lay over the top of the pie. Trim and crimp the sides, and cut slits in the top. brush the top with egg wash.  Bake at 375* for 45 -60 minutes. Wait 10 min before cutting into it will be HOT!


Saturday, May 5, 2012

Lime Meltaways


This cookie is by far my Dad's favorite cookie in the whole wide world! On the other side of the spectrum this cookie almost changed my career path. One time while making these cookies about 11 or 12 years ago I burned my hand when pulling them out of the oven. I screamed "I AM NEVER PUTTING MY HAND IN A OVEN EVER AGAIN!!" Yeah luckily I got over that, I reach into ovens all day.  Since lime meltaways are my dad's favorite cookie he begs me all the time to make them. I got the recipe while watching The Martha Stewart Show back in the day. When I was reading the new issue of Martha Stewart Magazine and saw the recipe it reminded me that I should be a good daughter and send some to my dad. It also helps that limes are on sale this weekend since it's Cinco De Mayo.

Lime Meltaways!
adapted from Martha Stewart
1 cup of Salted butter Softened to room temp
2/3 cup powdered sugar
 3 small limes zested and juiced
1 TBS vanilla extract
1 3/4 cup all purpose flour
2 TBS cornstarch
1/3 cup powdered sugar

To get the most juice, first soften in the microwave for 15 sec, then roll on the counter. 


Preheat oven 350*
In a mixer beat butter with 2/3 cup powdered sugar till light and fluffy. Add lime zest, juice and vanilla extract. Scrape the sides of the bowl for even mixing. Whisk flour and cornstarch together, then add to creamed butter and sugar. Beat on low speed till dough comes together. This dough is super sticky!


Traditionally this cookie is rolled into a log and then frozen, then sliced thin. But I am doing 2 other methods, first  is rolling the dough between 2 pieces of parchment, then chilling for 30 min, after chilled use a cookie cutter.

Or dropping the cookie by tablespoons onto a parchment lined cookie sheet and lightly flatten them with your palm.
Bake till light golden in color, pull form the oven and let sit about 5 min. While still hot coat in the reserved 1/3 cup powdered sugar.

Since this cookie doesn't have raw eggs, it's a great batter to eat before baking!

Little Lime stars! Just melt in your mouth!


Friday, May 4, 2012

PB & J Pop Tarts

Some of the perks of working in a bakery I get to bring "scraps" home. Today I was fortunate enough to bring a huge chunk of pie dough home with me. Our dough is amazing- since I can't give you the recipe I will send you to a site that has a great comparable recipe. The best part of the dough is it is all butter! No shortening-Yay! So what to do with a giant chunk of pie dough? Make POP TARTS!! The filling combinations are endless. I stayed simple with homemade strawberry-blackberry Jam. Then a few PB&J since my boys L-O-V-E peanut butter! I just bit into one and Holy Cow! AMAZING!!  Flaky, crunchy fruit filled pillows, how can anyone resist?  The best part is that they can be frozen before baking so you don't have to be tempted to eat all of them as they come out of the oven. As I am typing this I have already had 2 1/2. I must stop and save some for the boys! The only healthy thing about this that there is a tiny bit of fruit. Otherwise this is a buttery- sugary treat. It looks like all you really need is a ton of tools, don't be intimidated. A pastry cutter is optional, it just makes the edges really cute. If you don't have access to a pastry brush using a paper towel works alright. No pizza cutter? well then use a knife, a pizza cutter makes it quicker. No rolling Pin? use a wine bottle -full or empty works in a pinch but trust me kinda a pain in the butt. I like the look of crystal sugar on top it seems to pull everything together, it's not super easy to find but not impossible either. I hope you love this as much as I have!


Tools:
Pizza cutter, pastry brush, pastry cutter, ruler, rolling pin

PB&J- Pop Tarts
Preheat oven 375*
Peanut Butter- Smooth or Chunky
Jam- homemade or store bought
1 egg
crystal sugar
rolling pin
fork
pastry brush
ruler
pizza cutter
pastry cutter (optional)


Ready to roll- Only in small batches, it's good not to overwork the dough. Dust the counter with a little flour to prevent the dough sticking to the table. 
Roll the pie dough out pretty thin then using  a ruler and pizza cutter to make the same size pieces, I made my first set rectangle, and second set square. (3X3 or 3X4) Then spread filling in the middle avoiding the sides so they can be sealed. I was informed that it could have some more filling. Peanut butter is thicker so I used more in those ones. Only put filling on 1/2 the squares, leave the others empty to use as the tops.
Make a egg wash by beating the egg in bowl with fork and adding a 1tsp of water. Then using the pastry brush; brush the sides of the dough that has the filling. To assemble: place empty dough square over the top and press the sides down with fingers to seal in the filling. (If you don't do this it will result in the filling leaking out the sides!) To make the sides pretty: take the fork prongs and press along the sides this will give the crinkle look. At this point you can leave it - or use the pastry cutter and that makes the sides even cuter! P.S I only have one because I found it at the thrift store for .50 cents.
Place on sheet pan with parchment paper: If no parchment just spray the sheet pan.  I pricked the top with the fork to make the indents over the filling.  Place in the fridge for 10-15 to chill the dough down before baking- Or at this point you can freeze them to bake later!. Before baking brush with the egg wash from before, and sprinkle with crystal sugar- optional. Bake for 7 min then check and turn sheet pan, and then another 7 min or so. It all depends on the size they are. Lets say just bake till golden brown.
Once they come out of the oven let cool for 8-10 min- Trust me Molten hot berry jam is NOT good for the roof of your mouth! Once completely cool store in airtight container for 3-5 days. I don't recommend putting in the toaster, looking at the picture you can see that some of the jam oozed out, not a good idea for the toaster.